To add an image to a web page you use the img tag.
<img src="your-image.png" alt="your-image" />
Simple as that.
But you need to use a binary file.
If you work on an embedded system, a html control with restrictions or simply need one plain html file, you can use images inline.
The picture data will be encoded with text characters (base64) and added as a class:
<style type="text/css">
    .my-picture
    {
        background-image: url(data:image/png;base64, BASE64 DATA );
        height: 24px;
        width: 24px;
        display: block;
    }
</style>
Later on, you reference the picture class to display the image:
<div class="my-picture"></div>
Here is a complete HTML sample:
<!DOCTYPE HTML PUBLIC "-//W3C//DTD HTML 4.01 Transitional//EN">
<html>
<head>
    <meta http-equiv="Content-Type" content="text/html; charset=utf-8">
    <title>base64 image/png</title>
    <style type="text/css">
        .back-button
        {
            background-image: url(data:image/png;base64,iVBORw0KGgoAAAANSUhEUgAAABgAAAAYCAYAAADgdz34AAADb0lEQVRIx52WT2hcVRTGf+fORJMgbYVEWv9uhEBaEpoMEem8DEKtm0qrWLCLItJFFyJIG5CIC12ni3ZhVRCKUEqJ1EVduNHUlzupm5k4Bptu1FUZwRhNTTMhNe9+LuYlDclMk/Rs3uXdc7/z3nfOd841mliUzz+GWbdBL3AQ6BTsAszgDjADjAkqSDd9sfhvIxxb/2IwiloEXcDbVn/eBaaAKjCXuu0E9gA9wA5Jv2F2EbjlvV9qGqBQKLgQwiGDYeAPpMsym3TOVeM4Dg18d5vUCxyX2fPAWZck1+IbN5Y3BCgUCi4kyRBwFLjki8ULbMOifP4tMzsl6bqTPoonJv4DcCu0hBAOAUcx+8zgS7ZrZqPAOTN7KTh3JIqi1tUAgq6UlksmXR0vFhe2i++9XxR8g/QpMATsBbC0Wj42eGrc+zcbHR4YGDAzywA2Pz+/PD09rQcFG8znvxDcw+wDl5ZiF9LlZgdCCC8mSTKcJMlJILPZ38jsipk9B/S6tM7vymyykXMul3saOAecAGpAsilf0hQwa9CXTUX0s3Ouug44A+SBkTRX79Rqte82owfAZTIzCmESeDkLdAIb6jwF/xB4RtIZ4FZbW1tHf39/M9xauVxeAIjjWINRVBV0ZAW77L5C19IyAuwHZszstVQfVi+6VQ2tXY8CX62hac7MdjnA6b5juqdW4JF1irdN1hsyAVjW4J+0t6xauVz+NZfLnaGujb2SvgbGgXsPoH5hnfB2CuaywF/Ak4VCwa3Lww/AMjBiZqeBP2u12vdbSXJqewxmHTAG9IQQdq/dLZVKSalUioHXgQBcaG9vP9Hd3W1b6EsdQB8w5gQVYEfaFTdYqVS6DZwGrgJPtLa2tmyhL+1L50c5i3RT8LvBceDbxv42IakkKZPNZpe3QM8xSVUzqxhAFEX7gU+QPsds1Hu/yENYFEWPmnRYMIzZu977H126Nw2cNbNTBq9GUdT2UODwCvWCOG8hVFbbtfd+ySXJNUnXgfdMemPb40A6DLwP/CQYHZ+YWNw4Mg8caAnOHQGGTPpFZleQplwmMxPHsRpWSz2hx5BeAM4LRovF4lLToZ9Oon1IJ83sWWAWmARuI91ZEVE69PuATklVzC5aCJWVL28aYE2gx4Eeq4McFHRYem0RzFk98JigbFAZ9/7vRjj/A6BAc6F41EmIAAAAAElFTkSuQmCC);
            height: 24px;
            width: 24px;
            display: block;
        }
    </style>
</head>
<body>
    <p>This is a back button</p>
    <div class="back-button"></div>
</body>
</html>
To convert between picture files and base64 data, you can use these PowerShell lines
From a file (for example 'p24.png') to base64 data:
$bin = Get-Content p24.png -Encoding Byte
$str = [System.Convert]::ToBase64String($bin)
From base64 data to a file (for example 'p24.png')
$str = "your BASE64 DATA"
$bin = [System.Convert]::FromBase64String($str)
Set-Content p24.png -Encoding Byte -Value $bin
Simple as that, but keep the image size small.
Tooltips gets displayed as the string part after the '\n' char of the matching resource. So in case you were wondering why you don't see tooltips in your new ribbon if you use your existing string IDs, add the newline to the string resource.
But how to change tooltips of the MFC ribbon bar at runtime?
Using the OnToolTipNotify doesn't work with the MFC ribbon bar because no IDs are used.
But here is a trick to make it work:
Derive a new class from the CMFCRibbonBar class to override the TTN_NEEDTEXT message.
class CMyRibbonBar : public CMFCRibbonBar
{
protected:
    //{{AFX_MSG(CMyRibbonBar)
    afx_msg BOOL OnNeedTipText(UINT id, NMHDR* pNMH, LRESULT* pResult);
    //}}AFX_MSG
    DECLARE_MESSAGE_MAP()
};
Set the TTN_NEEDTEXT message handler.
BEGIN_MESSAGE_MAP(CMyRibbonBar, CMFCRibbonBar)
    ON_NOTIFY_EX_RANGE(TTN_NEEDTEXT, 0, 0xFFFF, &CMyRibbonBar::OnNeedTipText)
END_MESSAGE_MAP()
The new TTN_NEEDTEXT message handler gets the original tooltip text, modify the text and sends back the new tooltip text. The MFC ribbon bar does not send the resource ID of the tool. Because of this, the tooltips are matched by string content.
BOOL CMyRibbonBar::OnNeedTipText(UINT id, NMHDR* pNMH, LRESULT* pResult)
{
    static CString strTipText;

    // get tooltip text
    BOOL ret = CMFCRibbonBar::OnNeedTipText(id, pNMH, pResult);

    LPNMTTDISPINFO pTTDispInfo = (LPNMTTDISPINFO)pNMH;
    strTipText = pTTDispInfo->lpszText;

    // modify tooltip text
    CString strRes;
    strRes.LoadString(ID_MY_UI_ELEMENT);
    strRes.TrimLeft(_T('\n'));

    if(strTipText == strRes)
    {
        // new content for ID_MY_UI_ELEMENT
        strTipText = "New tool tip content\r2nd Line";
        pTTDispInfo->lpszText = const_cast<LPTSTR>((LPCTSTR)strTipText);
    }

    return ret;
}
To set tooltip for the drop down menus, simply get the element via the ID, and use the SetToolTipText API. Here is an example on how it is done for the plugins menu in cPicture:
    // Add the tooltips.
    for (vector<FunctionPlugin>::const_iterator it = CRegisterFunctionPlugin::s_vec_function_plugin.begin(); it != CRegisterFunctionPlugin::s_vec_function_plugin.end(); ++it)
    {
        const UINT i(static_cast<UINT>(it - CRegisterFunctionPlugin::s_vec_function_plugin.begin()));

        CMFCRibbonBaseElement* pElement = FindByID(ID_FUNCTION_PLUGINS_START + i, FALSE, TRUE);
        if (pElement)
        {
            pElement->SetToolTipText(it->pluginData.desc);
        }
    }
The Unix time is the number of seconds since 1 January 1970.
In PowerShell:
((Get-Date "02/05/2013") - (Get-Date "01/01/1970")).TotalSeconds
1360022400
To get back the date from the number of seconds, use:
(Get-Date "01/01/1970").AddSeconds(1360022400)
2/5/2013 12:00:00 AM
If your system has a different locale, use the culture specific writing. For example using German ('de-DE'):
((Get-Date "05.02.2013") - (Get-Date "01.01.1970")).TotalSeconds
1360022400
(Get-Date "01.01.1970").AddSeconds(1360022400)
Dienstag, 5. Februar 2013 00:00:00
In case you have a format in a locale that is different from your PowerShell locale:
$DateTime = [DateTime]::Parse("05/02/2013", [System.Globalization.CultureInfo]'fr-FR')
($DateTime - (Get-Date "01.01.1970")).TotalSeconds
Note the difference between french and american date order: 05/02/2013 - 02/05/2013
Redirect web pages is common practice and often done with the meta tag refresh, but there are drawbacks and it is not recommended by the W3C. Using a HTTP redirection status code is preferred, but often simply not practical.
If you have a page http://oldsite.com/project/index.html and you need a redirect to http://mysite.com/project/, you simply place this index.html in http://oldsite.com/project/. In case JavaScript is disabled, the default meta refresh is used as a default:
index.html
<!DOCTYPE HTML>
<html>
<head>
    <title></title>
    <meta http-equiv="content-type" content="text/html; charset=UTF-8" />
    <meta http-equiv="refresh" content="1; URL=http://mysite.com/project/" />
    <script type="text/javascript">
        window.location.href = "http://mysite.com/project/"
    </script>
</head>
<body>
</body>
</html>
Here is how to redirect a subdomain to a directory using the rewrite rule in IIS.
For example, if you like to have subdomain.mysite.com/ point to mysite.com/subdomain/, you simply add the following domain-rewrite rule to web.config:
<?xml version="1.0" encoding="UTF-8"?>
<configuration>
  <system.webServer>
    <rewrite>
      <rules>
        <rule name="domain-rewrite">
          <!--
           subdomain.mysite.com/dir/index.html?abc -> mysite.com/subdomain/dir/index.html?abc
          -->
          <match url=".*" />
          <!-- {R:0} = dir/index.html -->
          <conditions>
            <!-- subdomain is the first capture '(.*)' = {C:1} -->
            <add input="{HTTP_HOST}" pattern="^(?!www)(.*)\.mysite\.com$" />
          </conditions>
          <action type="Rewrite" url="{C:1}/{R:0}" />
        </rule>
      </rules>
    </rewrite>
  </system.webServer>
</configuration>
The Zenitar 16mm f/2.8 is a manual focus/aperture full frame fisheye lens manufactured in Krasnogorsk/Russia. The full frame (the covered rectangle of the projected image circle) covers 180 degree FOV in diagonal on 35mm. See http://wiki.panotools.org/Fisheye_Projection and http://wiki.panotools.org/Special_issues_with_fisheye_lenses.
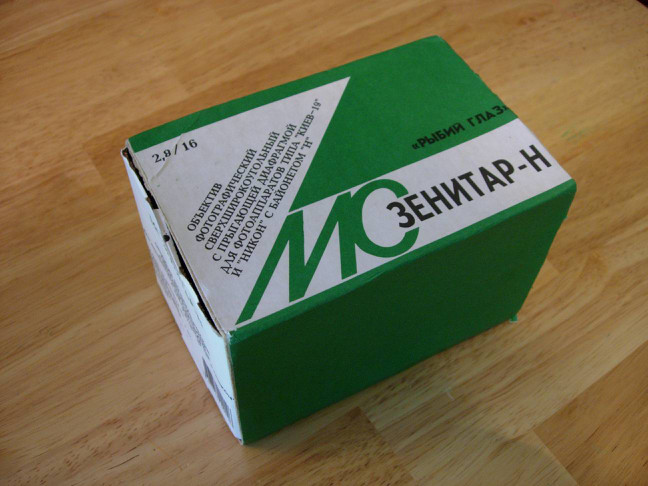
The lens is available for different mounts (M42, Nikon, Canon, ...). Zenitar-N is the model with a built-in Nikon F-mount and that is the model I ordered:
Here it is. Arrived in a weather proof bag from Russia:

Protected against the mail carrier:

With the seal already broken:
Inside the nylon case:

Wrapped in paper and authentically Russian manual:

And individually certified:

And it fits on the Camera (Nikon D-50)
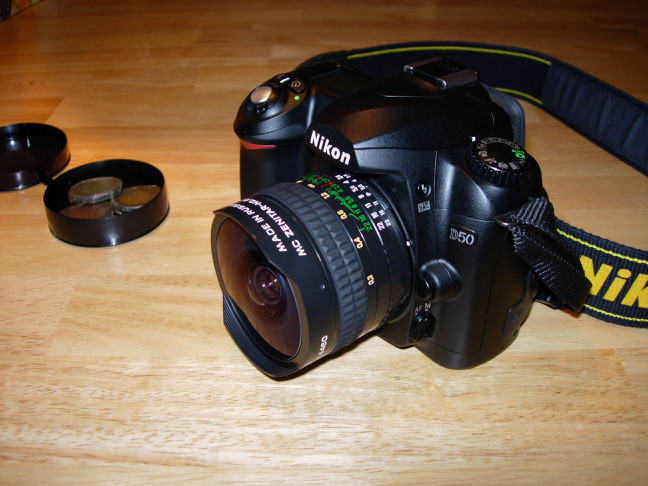
With three additional color filters available
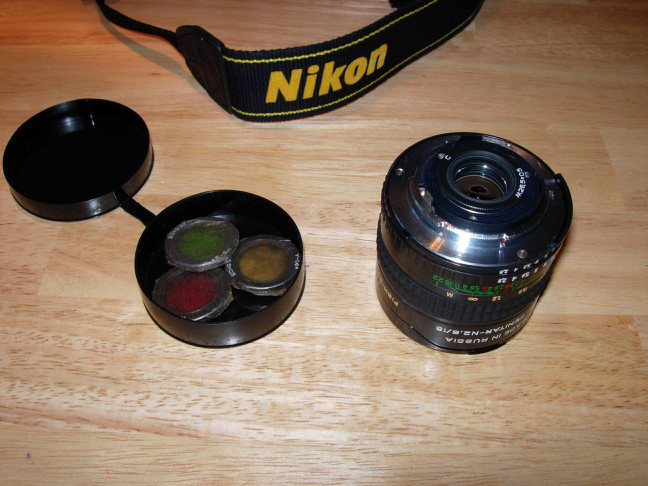
which get screwed in (at the F-Mount side):

But there was problem. The lens didn't focused to infinity. Instead the lens focused from 0.05m to about 1m. The picture were really sharp there, almost like a macro, but no one needs a fisheye macro. Sending back the lens? I already waited three weeks.
Why does the lens doesn't focus at infinity?
For some reason the distance settings ring wasn't aligned with the lens setting. Infinity for the distance ring didn't match the position for the internal lens ring. See the left drawing. With the wrong aligned distance ring, the distance range of the lens is shifted from 0.3m-infinity to 0.05m-1m.
How to fix this?
The distance ring needs to be aligned with the internal lens ring to allow the lens to be focused to infinity. This is illustrated in the right drawing. With the new aligned distance ring, the infinity distance can now be set. The minimal distance moved up from the 0.05 to the 0.3m.

The first step is to move back the rubber ring of the distance ring. Do not use any sharp tools, just slide the rubber back on one side a little bit and go around in a few circles to move it back slowly. On the lens barrel you will see three small holes (every 120 degree around the barrel) with a very small screw inside.
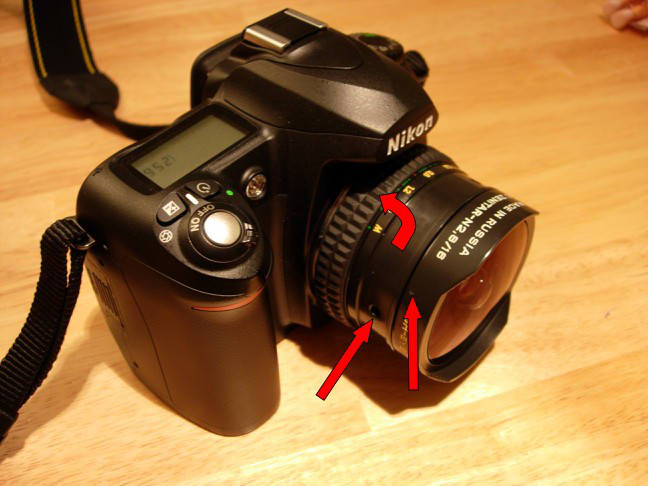
There are also three very tiny holes for the lens hood. Be careful with the tiny screws. Choose a screwdriver that matches the size perfectly. Do not use one that is too small. You might break the screw. (You screw up the lens!).
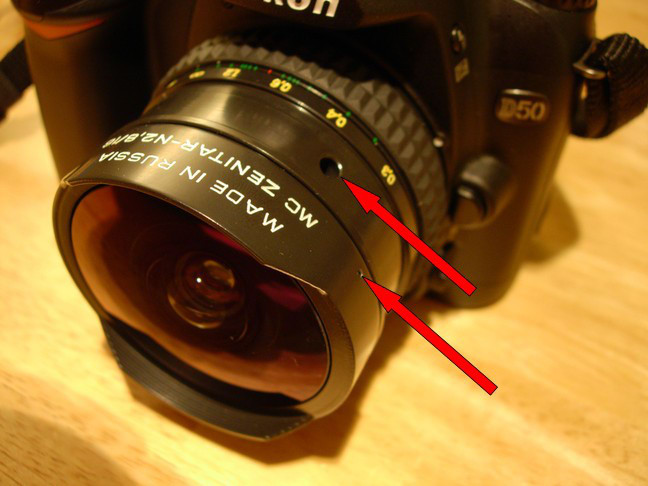
To have the lens focus to infinity, the lens hood needs to be adjusted as well. When you rotate the distance ring to infinity, the lens barrel extents towards the lens hood and might be blocked there preventing the lens extending to the infinity setting.

Don't remove the screws holding the distance ring. Just unscrew until the distance ring moves without being attached to the internal ring. Rotate the distance ring towards a smaller distance and tight the screws just to move the internal ring towards infinity. Look at the illustration above. You are moving the outer distance ring to shift the internal distance ring.
For the lens I received the infinity settings was exactly at the stop position of the internal distance ring. I had to move the ring as much as possible towards the infinity setting and the adjust the outer distance ring to match the red mark with the infinity symbol.
Once this is done, carefully tight the screws and slide the rubber ring back.
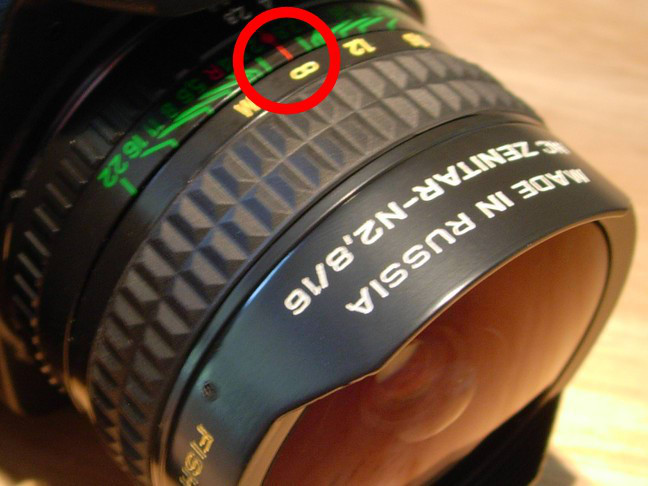
The Nikon D-50 for example cannot meter with this lens and the internal flash is disabled. You need to use the manual setting, set the exposure time manually and use an external flash (SB600/800) set to manual mode if you want to use a flash. At f/5.6 the lens seems to have an optimal aperture.
Some samples:


With the sun in the front:

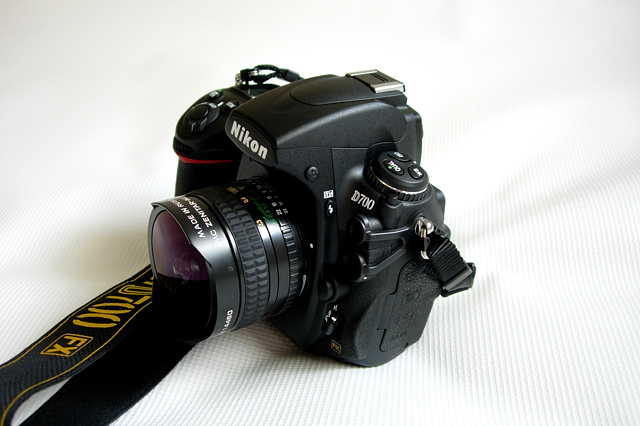
Das Objektiv Zenitar-N mit einer Nikon D700.
The Zenitar-N mounted on Nikon D700.
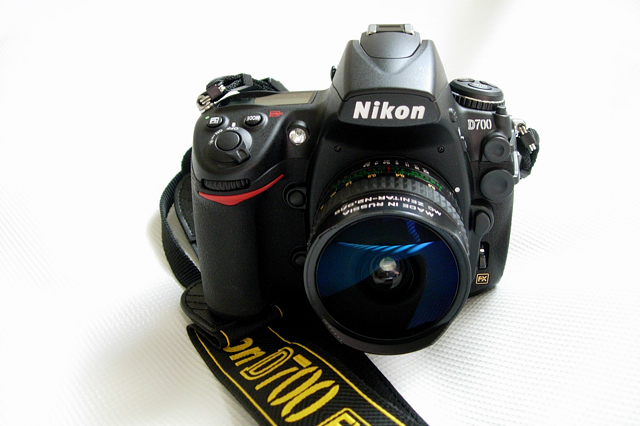
Beispielbilder mit unverkleinertem Ausschnitt des Randbereiches:
Sample pictures with 100% crop from the border:
f/2.8:

100% crop:

f/4.0:

100% crop:

f/5.6:

100% crop:

f/8.0:

100% crop:

f/11.0

100% crop:

f/16.0

100% crop:

f/22.0

100% crop:

Nahaufname:
Close focus:

Unverkleinerter mittiger Bildausschnitt:
100% center crop:

Entfernung auf Unendlich:
Infinity focus:

100% crop

Gegenlicht:
Lens flare:

